Friday, February 15, 2013

Kitchen Update

Awhile back I posted about how we had updated our Kitchen.
Ever since it got a face lift to the cabinets, a dishwasher {which it lacked before}, and an amazing pantry my dad built when he was in town,
I have been itching to make to add a few more decorative touches to it.
Quickly after that post I put the light plates back up & realized I had completely forgotten to paint under the cabinets {ooooops, forgot you could actually see that} haha!
So I thought I'd share the little  updates I made here and there with you all!


&& here it is currently:


Tuesday, February 12, 2013

From Trash to Treasure


Best part about living in a military community?
Everyone PCS's at some point && if they are in a hurry they often throw a lot of things away rather than trying to sell them.
A lot of my great finds have been found around trash night,
{yep, i'm that person. don't judge me. I have found some cool stuff! fo free yo.}
Like this little number:


You catch that duct tape action?


How about all that handy dandy rust going on? 


Not so pretty huh?
Yeah my husband looked at me like I was completely crazy when we drove past this on the side of the road next to someones dumpster && I made him turn around and get it.

I didn't realize how gross it was until we got it home, it had duct tape on it, it had wood stuck in the holes,
it was rusting,it was just gross
So I left it in our sun room for awhile.
Then one day I was like "yeah, I should probably deal with this now".
{more like my husband said "hey you should probably do some of these projects now ;) whoops, love you honey!!}

Long story short, anything can be made pretty with a little elbow grease!!


I wanted to keep it pretty simple and neutral with my house because I had no idea what I wanted to do with it or where I even wanted to put it.


Luckily these were made out of some really nice wood, it doesn't look it, but this stool is heavy!


The best part about it? It swivels :)


Once I had this piece done I thought about selling it, but its missing it's back and the holes probably wouldn't be that appealing to others.


So I moved it around my house until I sat it at the end of our kitchen counters one day & it's been there ever since.

I never thought "hey we should put a bar stool there" but we actually get a lot of use out of this bar stool!
When I'm cooking my husband will just sit there and chop stuff up for me or, I use it for when I'm doing laundry as a place to set the clean clothes as I'm folding them, 
{or when I'm lazy and don't want to stand and fold laundry ;) haha lets be real here...}
Anyways, I can't picture not having this bar stool here now. It comes in a lot of handy && the best part is I got it for free and it wasn't too hard to fix up, nothing a little sanding, paint & stain can't fix :)


Have you ever gone trash picking?! It sounds a lot dirtier then it is, by no means do I suggest you go dumpster diving, but hey, just drive around and you might find something cool on the side of the road!
Try it out &  let me know if you find something cool ;)

Can't wait to share with you all a few little updates I've done to the kitchen tomorrow since I posted our D.I.Y. makeover last year!

xoxo
Jordyn Luise

Friday, February 8, 2013

DIY Chalkboard

This project was so easy you guys!!
Seriously, anyone can do it!
The best part?!?
it costs less than $20.


You can put one of these anywhere. 
I wanted something cool to put on my wall that went with the whole vintage-rusticy
 {I think I just created a new word?! ha}
 vibe we have going on in our house.

Materials:
  • 2 pieces of 1 inch piece of pine wood {or whatever border thickness you choose, and depending on the size of your chalkboard you might need more or less}.
  • Nails or Staples.
  • Picture Hanging Wire & Screws {to make it so you can hang it off the wall}
  • A piece of super thin wood {I got mine in the same isle at Lowes as the pine wood}
  • Some stain {Dark Walnut by Rustoleum is what I used for this!}
  • Chalkboard Paint {I used Valspar's Brand}
  • && 2  paint brushes! {I use the cheap dollar ones for stain because I just end up throwing them away}
  • & a protective coat. {I use Polycrilic because it is water based and can easily be washed out of your brushes & doesn't yellow over time!}

How you do it:

  1. First things First, you need to cut the chalkboard to the size you want. Keep in mind that a border is going over it so make it a little bit bigger than you really want.
  2. Cut the pieces of pine wood to make a border around the wood.
  3. After that you nail the border together {not too the actual chalkboard}
  4. At this point we stained the wood & painted the chalkboard with 3 coats of Valspars Chalk Board Paint
  5. After that we then nailed the frame & chalkboard together.
  6. Once your chalkboard is complete just screw two screws that are level into the back of the board, leaving them a bit raised & wrap some picture wire around the two to make it easy to hang up!
& viola! You have a chalkboard :)


It is the perfect way to add a little character or fun to a room! We use ours to leave each other messages, for to do lists, reminders & groceries lists downstairs next to our kitchen by our dogs food bowl. I couldn't think of anything to hang about it that made sense or didn't look out of place next to the kitchen or dog food station so I thought it was the perfect fit.

I hope this was helpful!
If you end of making one link one up to my Facebook page!
I would love to see it :)
If you have any questions feel free to email me, comment below or send me a message on facebook!

xoxo
Jordyn Luise

Thursday, February 7, 2013

Laundry Re-Vamp

Hey Everyone!
If you haven't noticed already I added a new page to the blog up at the top "Home Tour".
While it is currently under construction, I will be posting pictures && adding links up to my posts about our DIY Renovations// Rooms to that area!
For one of the first posts I thought I would link up our Laundry Room//Closet that I recently fixed up.
It cost me seriously nothing. Less than $80.
Ever since I got a Pinterest last year, {seriously addicting! add me here if you aren't already following me!}
I've been dreaming of redoing this little closet.
It sits right off of the kitchen & is in the hall way by our bathroom downstairs.
It was such an eye sore if the doors were open & I just hated looking at it so I felt it was time to make it less hideous & more functional and pretty.

Before:


It was just boring, an eye sore, & that wire shelf was slowly coming out of the wall.
I would just shut the door & forget about it.

After:


In my opinion, I think its 120% better.
It just looks so crisp & clean to me.
Perfect for a little laundry closet.


Instead of trying to fix that wire shelf I just took it out & replaced it with a piece of pine wood that I stained & sealed. I screwed some brackets to it that I bought & spray painted in Oil Rubbed Bronze by Rustoleum.
Which all together cost me about $20, most expensive part were the brackets, I already had the stain & sealer on hand.

When using the shelf I wanted to put a few things that were functional but also decorative since this part is visible throughout the whole downstairs I didn't want it to be such an eye sore when the doors were open.


Up on the top shelves I bought these two wire bins from Marshalls to store Laundry Goodies.
Extra dryer sheets, spot cleaner, woolite, ect.
Along with that we store our extra toilet paper & bleach up there as well.


I added a trash can so that I could throw the lint from the dryer away right there,
along with the trash can I bought a dish to put all the change & things that I find in our pockets as I do laundry.


Remember the D.I.Y. Laundry Soap Recipe I shared awhile back?
Ever since I made it I have never gone back to store bought, I LOVE it!


and of course the cutest tea light holder ever! I love burning a small "fresh linen" tea light in there, it makes it smell so good :)


& this little beauty I just had to put somewhere,
I had a big space left on the shelf so I thought this would be perfect for here.
My husband actually painted this for me, I had a picture of something similar to this as my background and we had a spare piece of canvas that he decided to surprise me with.


this is the view of the space from our dining room, this little part is right off of the kitchen and dining room and is right next to the guest bathroom.


Best part about it? I can just close it up once I'm all done using it if I don't feel like keeping it visible throughout the whole downstairs!

Not too shabby for a closet laundry room eh?


Sources:
Rug - Marshalls {bought this forever ago but they always get these kind of rugs}
Wire baskets - Marshalls $12.99 each
Wall color - White Dove by Valspar in Satin
Shelf; Wood, Brackets, Oil Rubbed Bronze Spray Paint, Dark Walnut Stain & Polycrilic Clear Coat - Lowes {I had everything on hand except the wood & brackets which were about 25ish dollars.}
Tea Light Holder - Micheal's Craft Store $3.99
White box for dryer lints - Marshalls {it is actually the package a candle came in haha!}
Antique Dish - Marhsalls $9.99
Trash Can - Ross $6.99

xoxo
Jordyn Luise

Tuesday, February 5, 2013

2013 ~ New Beginnings


I feel like it's time I come clean.
I am horrible at keeping up with this blog.
{but you guys already knew that}
I'm not here to have a pitty-party or anything but to be fair we have had A LOT going on this year.
Everything has just been one hit after the next.
We've experienced two deaths of fellow friends that has hit us hard, along with that,
my husband has been dealing with medical issues.
In his right hand two of his fingers just decided to go completely numb and he has lost a majority of his strength in them.
So add that all into the mix of the every day highs and low of marine corp life, work, school, ya know, the whole shebang  && you get a very very tired Jordyn haha.
{p.s. I have been sick non stop, this weather needs to make up its mind!!}
Blogging has just been low on my priorities lately.
SO, There is my long over due apology, I'm sorry!
But I promise, things have calmed down {I hope at least} 
Sooooo, I'm back.
Because I'm determined that 2013 will be a way better year!

&& with that being said.

I have a project to show you!

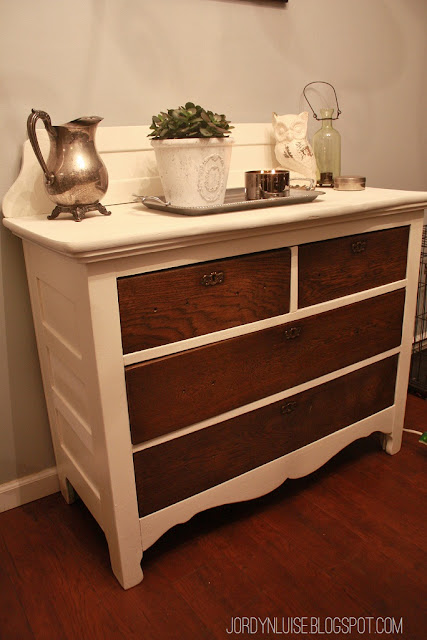
A few months ago I picked up this amazingly old antique dresser.
It was in pretty bad shape,
even though the girl before me had put a lot of time into stripping the old paint down, it had a lot more of work to go.
After days of sanding {seriously} a bottle of mineral spirit, this baby was ready to paint.
I have NEVER experienced paint like that before, it just would.not.come.off.
layers upon layers upon layers of bubbling paint.
it was a nightmare.

BEFORE:


I love love love this style of dressers.
they are my absolute favorite.


You have no idea how long it took to get all these layers off.
But with an antique like this, it REALLY needed it.
The paint had bubbled and cracked all over.
And not a "pretty" bubble crack either.


As you can see, there was lots and lots of paint, it would not budge.
I let mineral spirit sit on this for a few hours,
then I sanded, and sanded, and sanded,
&& gave up when it felt smooth haha.

 AFTER:


I have a lot of white & grey furniture in my house downstairs,
so for this piece I really wanted to bring everything together.
I thought the white & dark walnut would make the dresser match better against my dining room table


Both this dresser//buffet && my table are antiques.
Making them the same color made it feel like these were apart of a set.


As you can see, I have yet to find the perfect hardware for this baby.
It is a lot harder then it seems to find something that looks just right,
& 8 of them in fact haha.


I am SO in love with how this turned out {surprise surprise, ;)}
It feels like it just belonged here.


Plus I love the contrast of the dark wood with the bright white.
{paint color is white dove by valspar}
The bright white looks so good next to my vintage silver accents, so it's a win win.


and it's not complete without a little chippy owl in the mix! 
Remember that bottle candle holder I found while thrifting??
Well it's mate didn't last through my plane ride back home,
ever since I have been moving him around until it found the perfect home, right there on my buffet :)


I love the old key wholes on this piece, the gold also tied in the eclectic mix of finishes I have downstairs in my house; oil rub bronze, silver & gold.


And what's a buffet without fresh greenery && a yummy candle??
{calvin klein bitter sweet vine. he seriously makes the best candles ever}


So what do you think? I'm completely smitten with this old beauty.
By the way, did you see that my blog got a little re vamp?
I thought it was fitting, new fresh start to 2013 for my blog.
Also don't forget to check out my Facebook as well! I will be updating a few things around here on both the blog & Facebook page. Tutorials, Home Tour, Projects. ect. So keep your eye out!

Facebook link Here!


xoxox
Jordyn luise